Introduction to iPhone Screen Recording
The iPhone screen recording feature is a powerful tool for users. It lets you capture everything happening on your screen, just like taking a screenshot but for videos. This is useful for creating tutorials, visual guides, or even recording bugs to get tech support. Many iPhone users don’t know that this feature exists or how to enable it. In this section, we’ll explore how to add and utilize screen recording on your iPhone.
To start, you must add the screen recording function to your Control Center. The Control Center is a quick access hub for all sorts of iPhone features. If your device doesn’t have the screen recording feature in the Control Center by default, don’t worry. You can easily add it through your iPhone’s settings with a few taps.
Once set up, starting a screen recording is as simple as swiping to access your Control Center and tapping an icon. But there’s more to it, which includes managing audio settings and storage for your recordings. By the end of this guide, you’ll be screen recording like a pro and ready to manage and edit your recordings effortlessly.
How to Add Screen Recording to Control Center
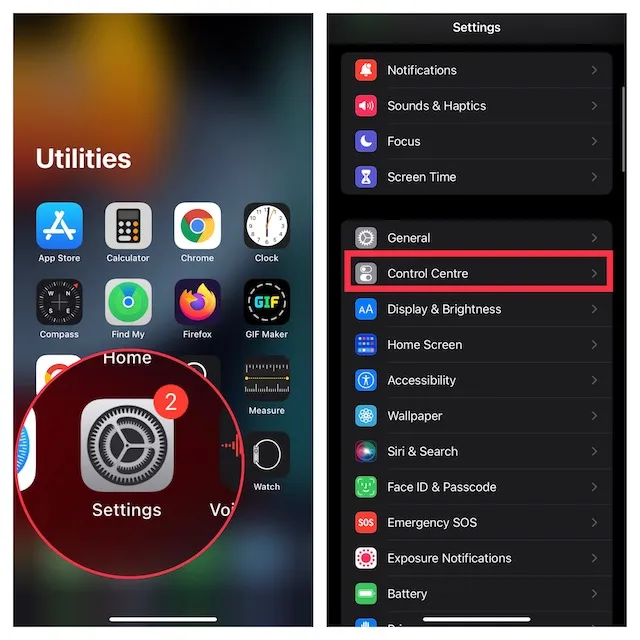
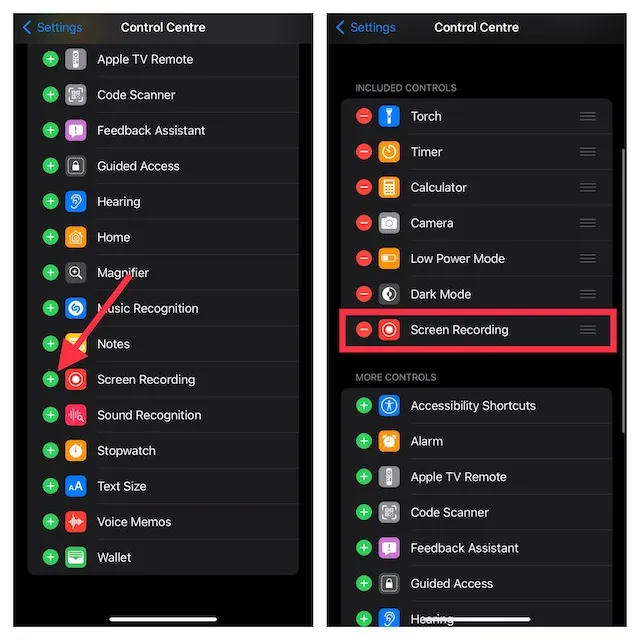
Adding screen recording to your iPhone’s Control Center is straightforward. Begin by opening your iPhone’s ‘Settings’ app. Scroll down and tap on ‘Control Center’. This is where you customize what features are available. Look for the ‘More Controls’ section. Screen Recording should be listed here. If it’s not in your Control Center already, you’ll see a green plus icon next to it. Tap on the green plus icon to add Screen Recording. Now, it should appear in the ‘Include’ list at the top. This means it’s in your Control Center.
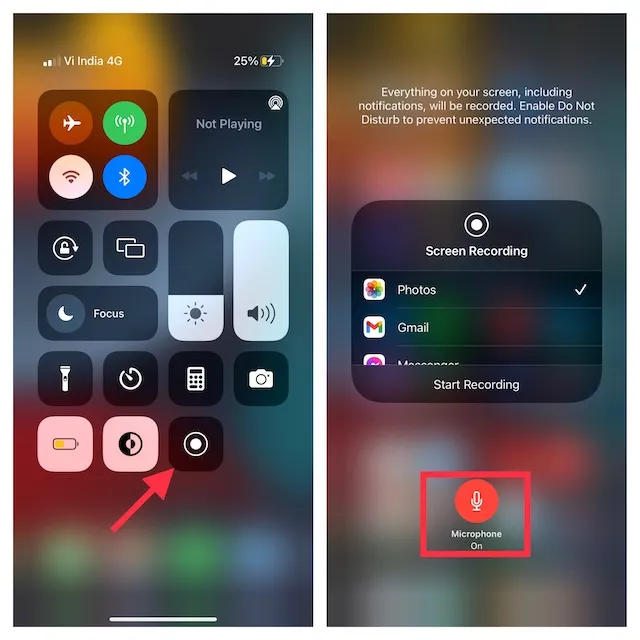
Swipe down from the top right corner of your iPhone screen. This opens the Control Center. You should see a new icon that looks like a dot within a circle. That’s the screen recording button. From now on, a single tap on this icon starts a screen recording. Remember, you need to ensure you have enough storage space for your recordings. This new addition to your Control Center allows you to capture your screen anytime.
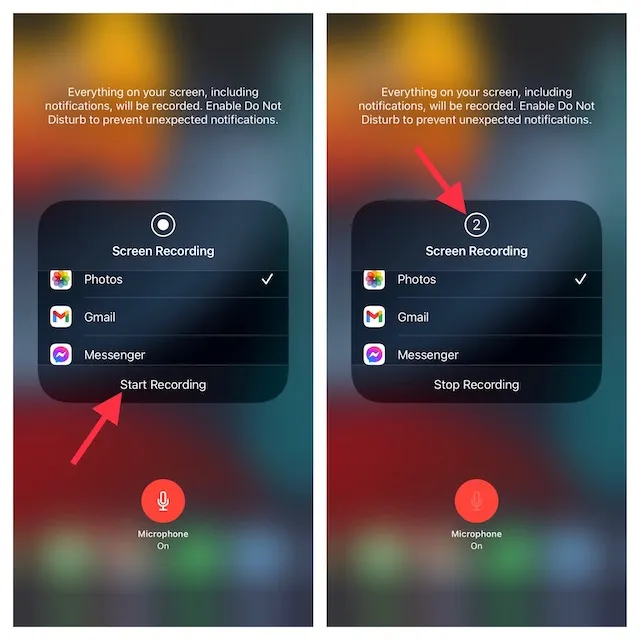
Before you start recording, decide if you need audio. For voiceovers or in-app sounds, enable your microphone. Do this by pressing down on the screen recording icon. Then tap the microphone icon when it shows up. Now, you’re all set to record with audio. Each time you enable screen recording, check that your ringer is on. This ensures your iPhone captures the sound.
Step-by-Step Guide to Enable Screen Recording
Follow these simple steps to enable screen recording on your iPhone:
- Open Your Settings App: Begin by tapping on the ‘Settings’ icon on your iPhone.
- Navigate to Control Center: Scroll and locate ‘Control Center’; tap to open it.
- Customize Control Center: Look for ‘Screen Recording’ under ‘More Controls’.
- Add Screen Recording: If it’s not yet in your Control Center, tap the green plus icon beside ‘Screen Recording’.
- Check Your Control Center: Swipe down from the top right to view your Control Center. You should now see the screen recording icon.
- Prepare for Recording: Decide if you need audio. For narrations or app sounds, press hard on the screen recording icon and tap the microphone.
- Check Storage: Make sure you have enough storage on your iPhone to save the recording.
- Record: Tap the screen recording icon to start recording after a three-second countdown.
- Stop Recording: Click the screen recording icon again to stop.
- Find Your Recording: Access your screen recording in the Photos app under ‘Recently Added’.
Remember, your ringer must be on to capture audio. Press down on the screen recording icon and ensure the microphone is on for voiceovers. These steps will launch you into the world of screen recording with ease. Ensure your recordings are saved correctly by checking your settings and storage availability beforehand. Happy recording!
Starting Your Screen Recording Journey
With the Screen Recording feature added to your Control Center, you’re ready to begin capturing video from your iPhone’s screen. Here’s how to start your screen recording journey:
Access the Control Center:
Swipe down from the upper right corner of your iPhone’s screen to reveal the Control Center.
Initiate Recording:
Look for the screen recording icon—a dot inside a circle—and tap it to start recording. You’ll see a countdown of three seconds; this is your cue that recording is about to begin.
Record Your Screen:
Perform the tasks on your screen that you wish to capture. The status bar at the top will turn red to indicate recording is in progress.
Conclude the Recording:
To stop recording, tap the red status bar at the top of the screen and confirm by selecting ‘Stop’. Alternatively, you can open the Control Center and tap the screen recording icon again.
Review Your Recording:
Your screen recording will be saved automatically to your Photo Library. Navigate to your Photos app to find and view your recording.
During the process, make sure your device has sufficient storage for the video files. If storage is low, clear some space or transfer files to ensure smooth recording. With these steps, you’re on the path to mastering iPhone screen recordings and capturing everything from gameplay to app tutorials with ease.
Ensuring Audio is Captured in Screen Recordings
Ensuring your screen recording captures audio is vital for a complete visual experience. Here’s how to make sure you don’t miss a beat:
- Check Your Ringer: First, turn on your iPhone’s ringer. It allows the screen recording to record sounds.
- Enable the Microphone: Before recording, long-press the screen recording icon in the Control Center. When the microphone icon shows up, tap it. Now, the recording will capture audio from the microphone.
- Adjust Volume Levels: Make sure the volume is up for media playback. This sets the right level for the screen recording’s audio.
- Do a Test Recording: Try a short screen recording to test audio capture quality. If it works well, proceed with your actual recording task.
- Check for Interruptions: During recording, avoid incoming calls or notifications. These can disrupt audio capture.
- Review the Recording: After recording, go to your Photos app and play the video. Listen carefully to confirm audio was recorded as expected.
By following these steps, your screen recordings on iPhone will include clear audio to match the visual content. Always do a test run to ensure everything is set up correctly for a seamless recording experience.
Accessing and Managing Your Screen Recordings
After capturing your screen activities, your iPhone automatically saves the recording to your Photo Library. Here’s how you can access and manage these recordings with ease:
- Open Your Photos App: Tap the Photos icon on your home screen to get started.
- Locate Screen Recordings: Go to the ‘Albums’ tab and scroll to ‘Media Types.’ Here, you’ll find the ‘Screen Recordings’ album.
- Play a Recording: Simply tap on a recording to view it. Capture every detail as it replays your actions.
- Edit Recording Details: Stay organized by renaming your screen recordings. Press ‘Edit’ while viewing a recording to change its name.
- Manage Storage: Screen recordings can take up significant space. Regularly review and delete unneeded ones to free up space.
- Share Your Recordings: Want to send a recording to someone? Tap the share button and choose how to share it.
By knowing how to handle your screen recordings, you can use them more effectively. Keeping them organized and maintained ensures you get the most out of this handy iPhone feature.
Editing Screen Recordings with Third-Party Apps
After you have saved your screen recordings to the Photo Library, you might want to edit them. iPhones come with a basic video editor, but for more advanced edits, third-party apps are the way to go. These apps offer a range of features that can help enhance your screen recordings.
Here are the steps to edit your screen recordings with third-party apps:
- Choose an App: Pick a reliable video editing app from the App Store. Look for apps with good reviews and the features you need.
- Import the Recording: Open the app and import the screen recording from your Photos app.
- Edit the Video: Use the app’s tools to trim, cut, or combine clips. Add text, music, or filters to make your recording stand out.
- Save the Edits: Once you’re happy with the changes, save the edited video back to your Photos app or directly within the third-party app.
- Export or Share: Export the finished product to your desired format or share it directly from the app.
Some popular apps for editing include iMovie, which is free for iOS users, and other apps like InShot and Splice. Each app has a different set of tools and capabilities, so choose one that suits your editing goals. Remember to keep the app updated for the best performance and new features. Editing your iPhone screen recordings with these apps can take them to the next level. Happy editing!
Troubleshooting Common Screen Recording Issues
Even with the simplicity of the iPhone’s screen recording feature, users may encounter issues. These problems can range from recordings not saving properly to audio not capturing. Let’s tackle some common troubleshooting steps to ensure smooth screen recording on your iPhone.
- Check Storage Space: If a recording fails to save, your iPhone might be low on storage. Delete unnecessary files or transfer them to cloud storage.
- Restart Your iPhone: Sometimes, a simple reboot can fix technical glitches with screen recording.
- Update iOS: Outdated software can lead to recording issues. Ensure your iPhone’s operating system is up to date.
- Examine Audio Settings: For missing audio, recheck the ringer is on and the microphone is enabled when you start recording.
- Close Other Apps: Background apps can interfere. Before recording, close any apps that aren’t required for the task you’re capturing.
- Reset Your Settings: If problems persist, you can reset all settings on your iPhone. This won’t delete your data but resets system settings to default.
- Test Third-Party Apps: Some recording problems may be due to third-party apps. Try disabling them to see if that solves the issue.
- Consult Support: If you’ve tried everything and still face issues, contact Apple Support for professional assistance.
By following these steps, you can overcome most problems related to how to enable screen recording on iPhone. Keep your software updated and storage in check to prevent future issues. Happy recording!