In the age of sleek smartphones and powerful gaming consoles, there’s a growing nostalgia for the simpler, pixelated era of handheld gaming. The charm of classic games, combined with the portability of a handheld device, has sparked a DIY movement among retro gamers. This article will guide you through the exciting process of building your own handheld game console, from choosing the right components to assembling and programming it.
Choosing the Right Components
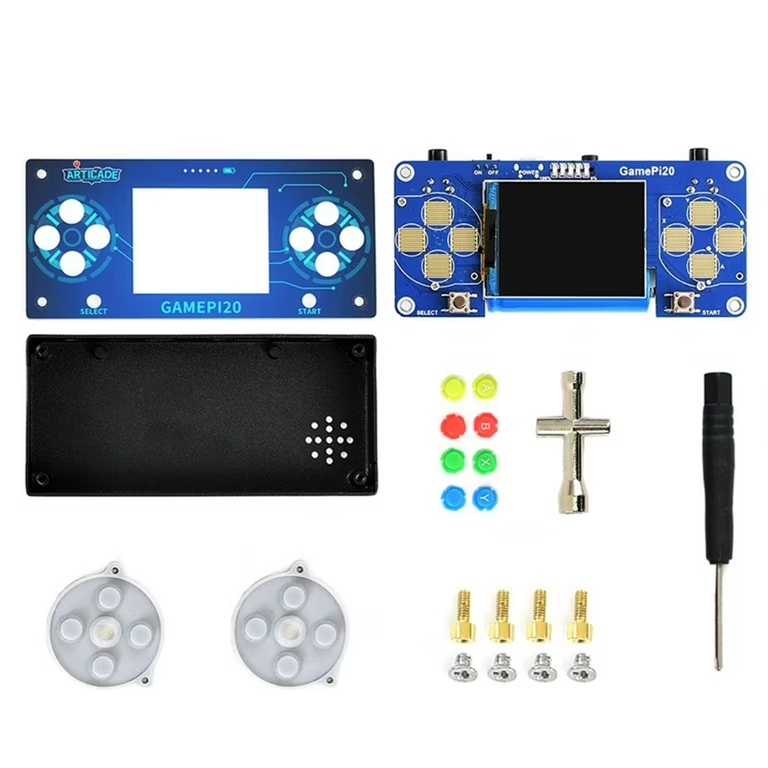
The first step in your DIY journey is to select the essential components. Here’s a breakdown of the key elements:
- Microcontroller: The brain of your console. Popular choices include the Raspberry Pi Pico, Arduino Nano RP2040, and Adafruit Feather RP2040. These microcontrollers offer powerful processing capabilities and are relatively easy to program.
- Display: The screen where the magic happens. Consider options like the 2.4-inch TFT LCD or the 3.5-inch IPS LCD. The choice depends on your preference for screen size and resolution.
- Buttons: The controls that bring your games to life. You’ll need buttons for directional input (up, down, left, right), action buttons (A, B, X, Y), and a start/select button.
- Power Source: A battery or power bank to keep your console running. A Li-Po battery is a popular choice for its high energy density and lightweight design.
- Enclosure: A case to protect your components and give your console a stylish look. You can 3D print an enclosure or use a pre-made case designed for Raspberry Pi or Arduino projects.

Assembling Your Console
Once you have your components, it’s time to start assembling your console. Here are the general steps involved:
- Prepare the Enclosure: If you’re using a 3D-printed enclosure, ensure it’s clean and free of any debris. If you’re using a pre-made case, prepare the necessary cutouts for the display, buttons, and power connector.
- Mount the Display: Securely attach the display to the enclosure using screws or double-sided tape. Ensure the display is properly aligned and the cables are routed neatly.
- Install the Buttons: Mount the buttons to the enclosure, making sure they are positioned comfortably and respond to input.
- Connect the Components: Connect the microcontroller, display, buttons, and power source using jumper wires. Be careful to follow the correct pinouts and wiring diagrams.
- Test the Hardware: Before proceeding to software, test your hardware to ensure everything is working correctly. Power up your console and check if the display lights up, buttons respond, and the microcontroller is functioning.

Programming Your Console
The fun part comes next: programming your console to run retro games. Here are two popular approaches:
Using Emulators:
- Choose an Emulator: Select an emulator that supports the games you want to play. Popular choices include RetroArch, MAME, and Snes9x.
- Install the Emulator: Transfer the emulator to your microcontroller and install it. This can be done using a variety of methods, such as using a programming IDE or directly copying the files to the microcontroller’s storage.
- Add Game ROMs: Transfer the game ROMs (game files) to your microcontroller’s storage. Make sure the ROMs are in the correct format and compatible with the emulator.
- Configure the Emulator: Configure the emulator to work with your specific hardware. This may involve adjusting settings for the display, buttons, and input.
Using a Game Development Framework:
- Choose a Framework: Select a game development framework like Pygame Zero or Arcade. These frameworks provide a simplified way to create games without the complexity of low-level programming.
- Learn the Framework: Familiarize yourself with the basics of the chosen framework, including how to create sprites, handle input, and play sound.
- Develop Your Game: Use the framework to create your own games or port existing games to your handheld console. You can design levels, characters, and game mechanics using the framework’s tools.
Additional Tips and Considerations
- Power Management: Implement power-saving features to extend battery life. Consider using low-power modes and auto-sleep functions.
- User Interface: Design a user-friendly interface to navigate through menus, select games, and adjust settings.
- Case Design: Consider the ergonomics and aesthetics of your console. A well-designed case can enhance the gaming experience.
- Battery Life: Optimize battery usage by choosing efficient components and power-saving techniques.
- Cooling: If your console experiences overheating, consider adding a small fan or heat sinks to dissipate heat.
- Troubleshooting: Be prepared to troubleshoot issues that may arise during the assembly and programming process. Refer to online forums and communities for help.
Performance and user experience
Building a DIY handheld game console is a rewarding experience, but it’s important to consider performance and user experience. While the thrill of creating a custom device is undeniable, the final product should be enjoyable to use. Here are some key factors to consider:
Performance Factors:
-
Microcontroller Power:
- Processing Power: The chosen microcontroller should be powerful enough to handle the emulators and games you want to run. More demanding emulators like PS1 or N64 will require a more powerful processor.
- Clock Speed: A higher clock speed will improve overall performance, but it can also increase power consumption.
- Memory: Sufficient RAM is crucial for smooth emulation.
-
Display Resolution and Refresh Rate:
- Resolution: A higher resolution display offers sharper visuals, but it also demands more processing power.
- Refresh Rate: A higher refresh rate provides smoother gameplay, especially for fast-paced games.
-
Emulator Compatibility and Performance:
- Emulator Choice: Different emulators have varying levels of performance and compatibility. Research and choose emulators that are optimized for your hardware and the games you want to play.
- ROM Quality: The quality of your ROMs can significantly impact performance. Corrupted or poorly ripped ROMs may cause crashes or glitches.
-
Power Supply and Battery Life:
- Battery Capacity: A larger battery capacity will provide longer playtime, but it will also increase the device’s weight and size.
- Power Consumption: Efficient power management is essential to maximize battery life. Consider using low-power components and optimizing the software.

User Experience Factors:
-
Ergonomics:
- Comfortable Design: The console’s size, weight, and button layout should be comfortable for extended gaming sessions.
- Screen Placement: The screen should be positioned at an optimal viewing angle to reduce eye strain.
-
Input Controls:
- Responsive Buttons: The buttons should be tactile and responsive, providing precise control over the game.
- D-Pad: A good D-pad is essential for accurate directional input.
-
Display Quality:
- Brightness and Contrast: The display should be bright enough to be visible in various lighting conditions and offer good contrast for clear visuals.
- Viewing Angles: The screen should have wide viewing angles to maintain image quality from different positions.
-
Sound Quality:
- Speakers: Built-in speakers should provide decent audio quality, but headphones or external speakers may be necessary for a more immersive experience.
-
Software and User Interface:
- Intuitive Interface: The user interface should be easy to navigate, allowing users to quickly access games and settings.
- Customizable Controls: The ability to customize button mappings is crucial for optimal gameplay.
By carefully considering these factors, you can build a DIY handheld game console that delivers a satisfying gaming experience. Remember, the key to a successful build is a balance between performance and user comfort.
Building a DIY handheld game console is a rewarding experience for retro gamers and hobbyists alike. By following these steps and leveraging the resources available online, you can create a personalized gaming device that brings back nostalgic memories and provides endless hours of entertainment. So, grab your tools, unleash your creativity, and embark on this exciting DIY adventure.


